
Buying a domain and hosting is the first technical step in starting a blog. The process is simple, but making the right choices early avoids future problems with SEO, speed, and reliability.
This guide walks through the exact steps with beginner-friendly decisions.
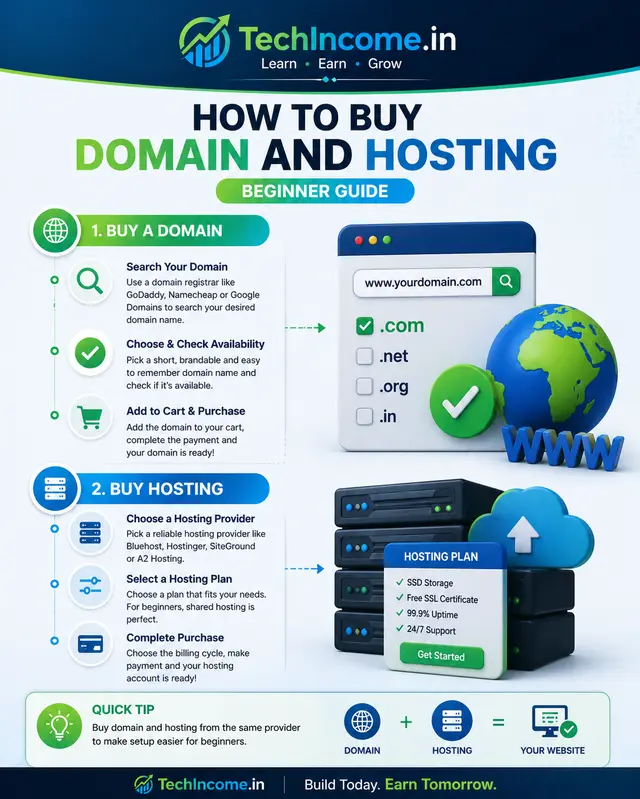
The Basics
You need two things:
- Domain → your website name (e.g., techincome.in)
- Hosting → where your website files are stored
Both can be purchased together or separately. What I have done for this website is I have purchased the Domain name from Godaddy and Hosting from Hostinger.
Step 1: Choose Your Domain Name
Your domain is your brand identity.
Guidelines
- Keep it short and easy to remember
- It should be overall relevant to what your are going to use it for
- It should build authority in the long run
- Avoid numbers and hyphens
- Use clear, relevant words
- Prefer
.comor.in(for Indian audience)
Examples
- Good: techincome.in
- Weak: best-online-income-123.com
Before finalizing the domain name you must make sure that the domain was not used in the past by someone else with a totally different niche.
For example if you are about a build a website to teach yoga classes and want to target specific city and you find that yoga<city>.com is available and blindly purchase it. And later on you figure out that the domain was used from some Massage Parlor for that specific city, you might find it hard to drive audience there.
So always perform a whois lookup which can show you if the domain was used by someone in the past or is it brand new.
You can also check on the web.archive.org if the domain was used by someone in the past, there must be some archived snapshot of the website. That way you know exactly for what purpose the domain name was used for and make an informed decision of whether you want to go with it or not.
Even if you find that the domain was used in the past by someone, but the snapshots in the web archive shows that the niche for with the domain was used is perfectly or positively inline with your current interest you can go for it.
Step 2: Check Domain Availability
Use a hosting provider or domain registrar to check availability.
Popular providers:
Search your desired name. If unavailable:
- Try slight variations
- Avoid complex spellings
Step 3: Choose the Right Hosting
If you are a beginner and want to host a website before any income revenue from the idea, then I strongly suggest that you go with some Shared Hosting plan. There are various hosting plans, Shared Hosting lets you host your site on a shared server space. The costing for this type of hosting are typically low compared to VPS hosting.
Trust me, if it is your first site and you haven’t earned a single dollar from your idea yet, then you should choose Shared Hosting.
Hosting affects:
- Website speed
- Uptime
- SEO performance
Recommended for Beginners
What to Look For
- Fast loading speed
- High uptime (99.9%+)
- 1-click WordPress install
- Customer support
Step 4: Select a Hosting Plan
Most providers offer multiple plans.
For beginners:
- Start with basic/shared hosting
- Upgrade later as traffic grows
Avoid expensive plans initially. People ignore this mostly because initially they have saved some money and want to go all in with their efforts. But that usually burns out the budget and later you feel like you want to experiment more, you are all out with the money. Make an informed decision that fits you.
Step 5: Register Domain + Buy Hosting
During checkout:
- You can:
- Buy domain + hosting together
- Or connect an existing domain
Important:
- Enable free SSL certificate (HTTPS)
- Choose billing cycle (12–24 months often cheaper)
Step 6: Connect Domain to Hosting
If bought together:
- It is automatically connected
If separate:
- Update nameservers from your domain provider
- Point them to your hosting provider
This step usually takes a few minutes to a few hours.
Step 7: Install WordPress
Use:
- WordPress
Most hosting providers offer 1-click installation.
After installation:
- Set site title
- Set tagline
- Login to dashboard
Step 8: Configure Basic Settings
Inside WordPress:
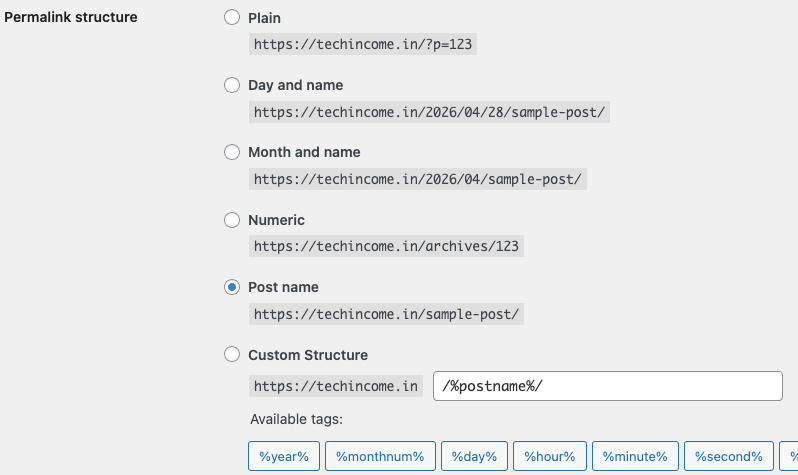
Permalink Settings (Important for SEO)
Set to:
- Post Name
General Setup
- Delete default posts/pages
- Set timezone
- Upload site logo
Step 9: Install Essential Tools
Keep it minimal.
Must-have:
- Rank Math
Optional:
- Cache plugin (for speed)
- AddtoAny (for social media sharing icons)
Step 10: Choose a Clean Theme
Design should prioritize speed and readability.
Recommended:
- Kadence
- Astra
- Blocksy
These all templates offer free starter templates good enough to get your website to traffic.
For this website techincome.in I am using Kadence theme.
Avoid heavy or complex themes.
Common Mistakes to Avoid
1) Choosing a Bad Domain Name
- Too long
- Hard to remember
- Irrelevant to niche
2) Buying Expensive Hosting Too Early
Start small. Upgrade later.
3) Ignoring SSL
Always enable HTTPS:
- Improves trust
- Required for SEO
- It is best security practice
4) Using Too Many Plugins
Too many plugins:
- Slow down site
- Cause errors
Keep the plugins you feel are really necessary.
Cost Breakdown (India)
Approximate yearly cost:
- Domain: ₹800 – ₹1,200
- Hosting: ₹2,000 – ₹4,000
Total: ₹3,000 – ₹5,000/year
Affordable for most beginners. I am once again telling you choose wisely, if you are purchasing today without proper research, do it only after proper research for your need.
How Long Does Setup Take?
- Domain + hosting purchase: 10–15 minutes
- WordPress setup: 10 minutes
- Basic configuration: 30–60 minutes
Total: ~1–2 hours
After all that, what remains is your website setup and customization.
What to Do After Setup
Once your site is live:
- Create core pages:
- About
- Contact
- Privacy Policy
- Start publishing content
- Plan your first 30 blog posts
Do not ignore the necessary pages like About, Contact, Privacy Policy, Disclaimer and Terms and Conditions.
These all are must have pages for your website if you are aiming to put some ads and earn.
Final Verdict
Buying a domain and hosting is simple. The real work begins after setup.
Focus on:
- Content
- SEO
- Consistency
Bottom Line
Do not overthink the setup. Choose a reliable provider, keep it simple, and move quickly to content creation.
Recommended Next Reads:
- https://techincome.in/best-wordpress-setup-beginners-2026/
- https://techincome.in/how-to-start-a-blog-in-2026-step-by-step-guide/
- https://techincome.in/how-to-use-rank-math-for-seo/
FAQs: How to Buy Domain and Hosting (Beginner Guide)
1. Should I buy domain and hosting from the same provider?
It is convenient but not mandatory. Beginners can buy both together for simplicity, but separating them gives more flexibility later.
2. Can I change my hosting provider after purchasing?
Yes. You can migrate your website to another hosting provider anytime without changing your domain name.
3. How long should I purchase hosting for initially?
Most beginners choose 12 months. Longer plans are cheaper per month but require higher upfront cost.
4. What happens if my domain expires?
Your website will stop working, and you may lose the domain if not renewed on time. Always enable auto-renewal.
5. Is free hosting a good option for beginners?
Free hosting is not recommended for serious blogging due to limitations in speed, reliability, and control.
6. Do I need to buy email hosting separately?
Not necessarily. Many hosting providers include basic email services, but professional email can be set up later if needed.
7. What is the difference between shared hosting and VPS hosting?
Shared hosting is cheaper and suitable for beginners. VPS hosting offers more control and resources but is not needed initially.
8. Can I use one hosting plan for multiple websites?
Yes, many hosting plans allow multiple websites, but check the plan details before purchasing.
9. Do I need technical knowledge to manage hosting?
No. Most hosting providers offer user-friendly dashboards and one-click installations for beginners.
10. What is uptime and why does it matter?
Uptime refers to how often your website is online. Higher uptime ensures your site is accessible to users and search engines consistently.